 It’s Friday. And I have a confession to make.
Last weekend I baked a cake.
Only it wasn’t a healthy, nutritious cake. But a bit more like a Big.Fat.Creamy.Sweet.Three layers.Kinda-cake. It was gluten free, dairy free and FODMAP-friendly though.
 On Monday my younger sister turned 19. She had come home from university for the week and I managed to take the day off work, so we got to spend the morning bounding around the house in pjs while she opened presents (the best ones from me obvs). In the evening we went out as a family for a beautiful meal to celebrate and we skipped dessert to come back to this baby. Bellies full of pizza and a couple of cocktails down it was a great finish in true birthday-sugar-style.
We try not to bake too many sweet recipes in our house because we always argue we end up eating it – too much too fast. And it wasn’t as if we didn’t have enough cake in our house – my aunt had already made a gorgeous gluten and dairy free chocolate cake and my sister’s friends had bought her a tray bake and another chocolate cake. But sometimes in exceptional circumstances you just need ALL THE CAKE and my little bubba getting older was one of them. Cue this ombre-iced birthday cake addition.
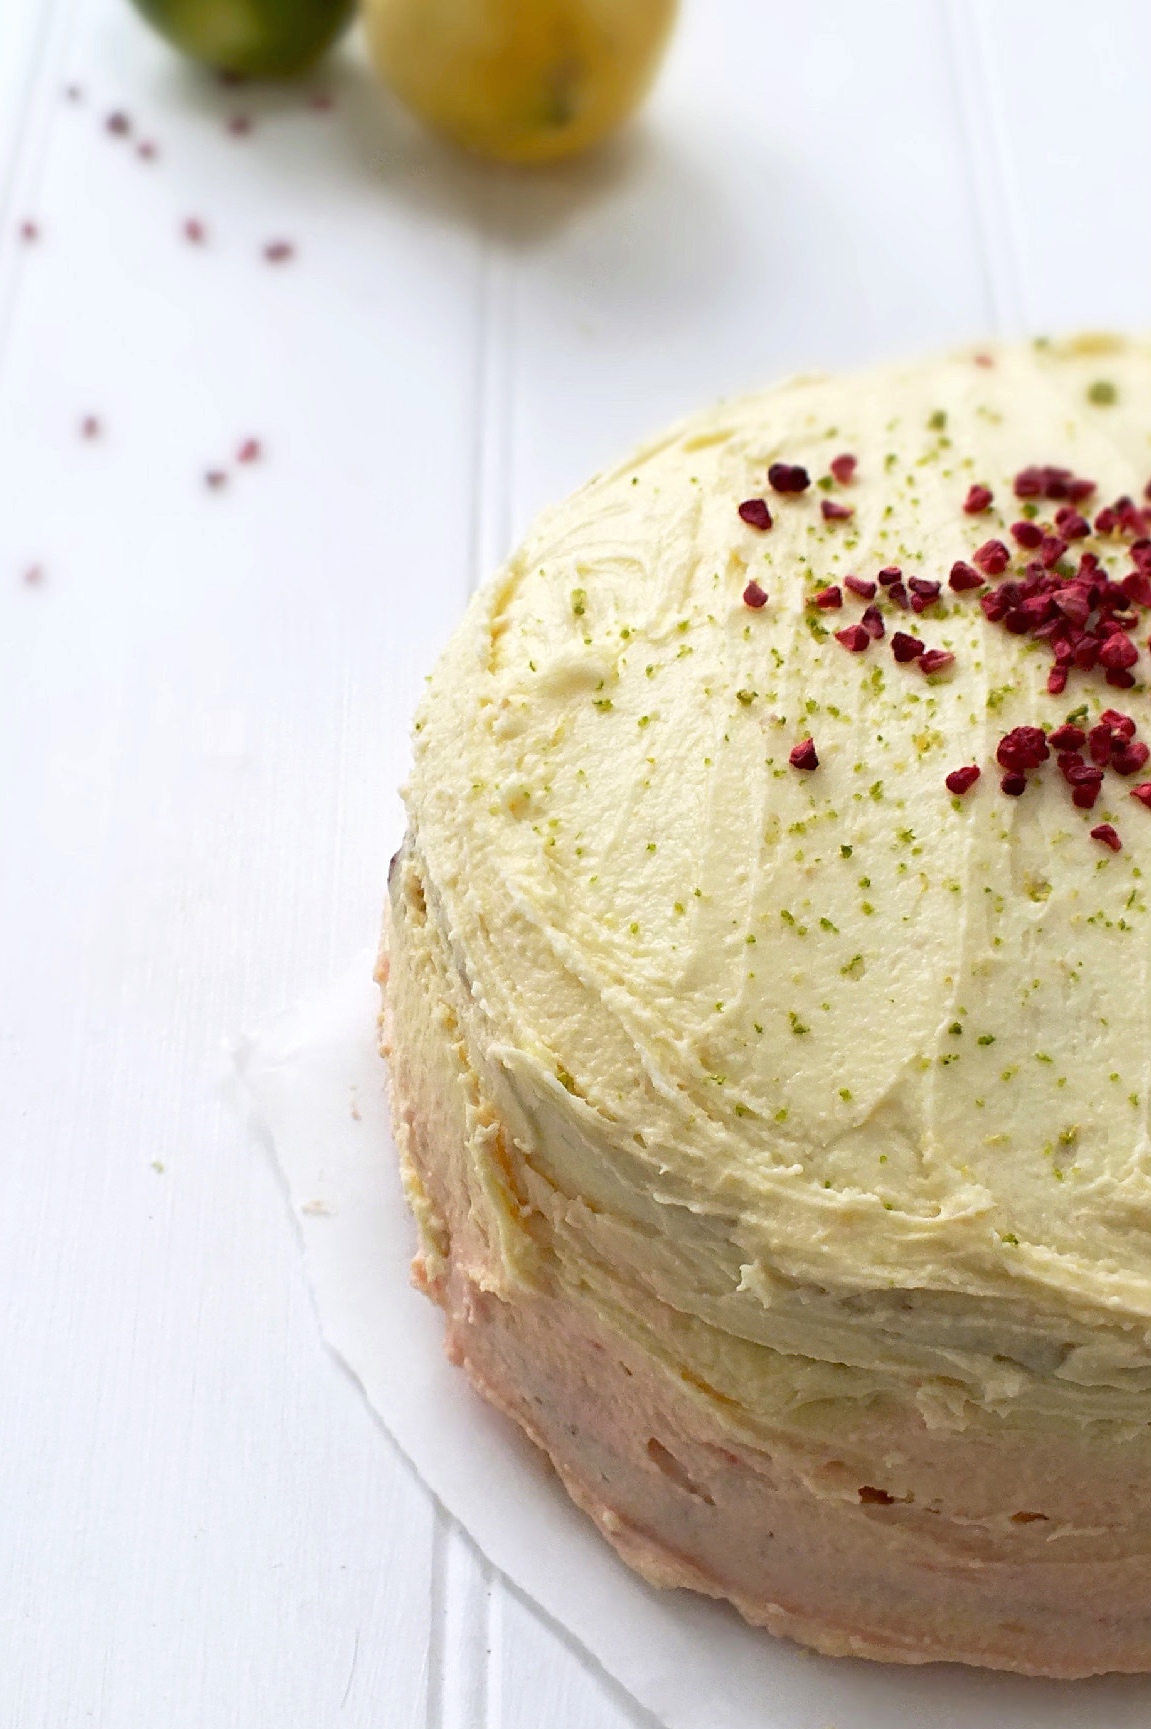
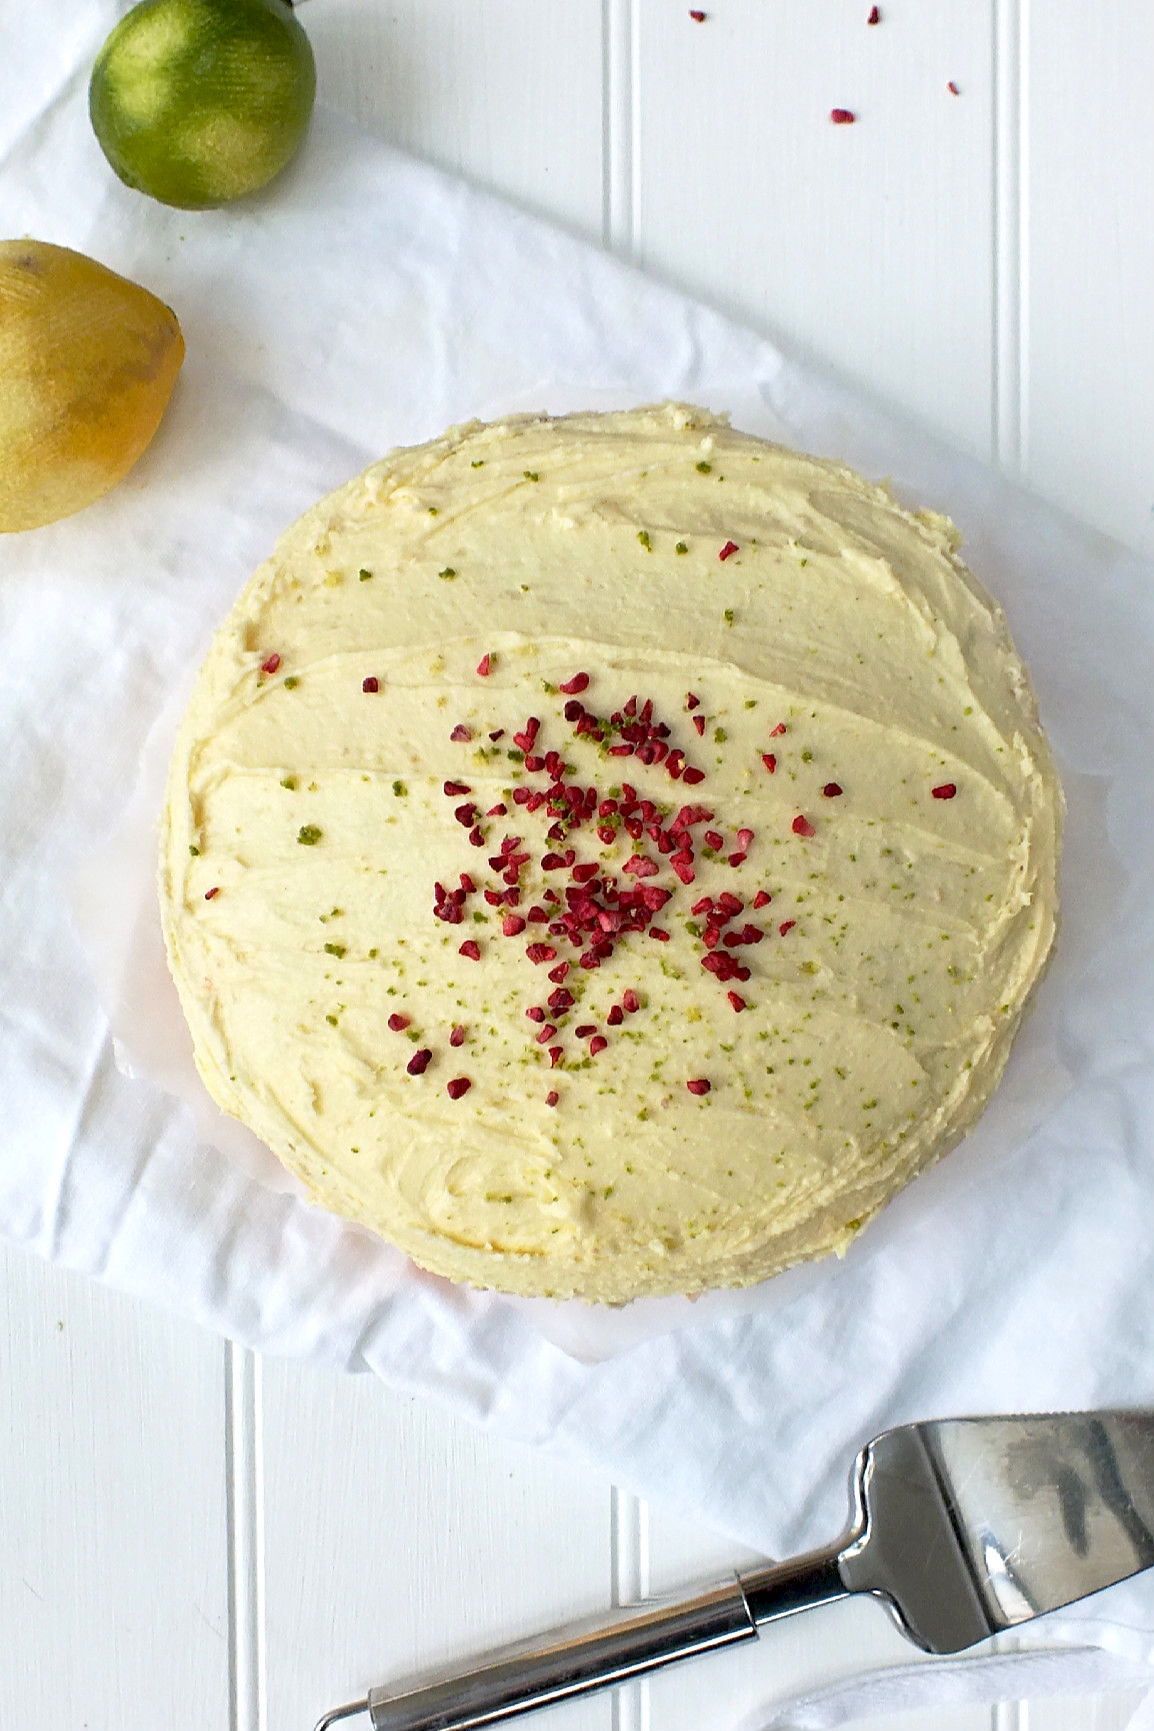
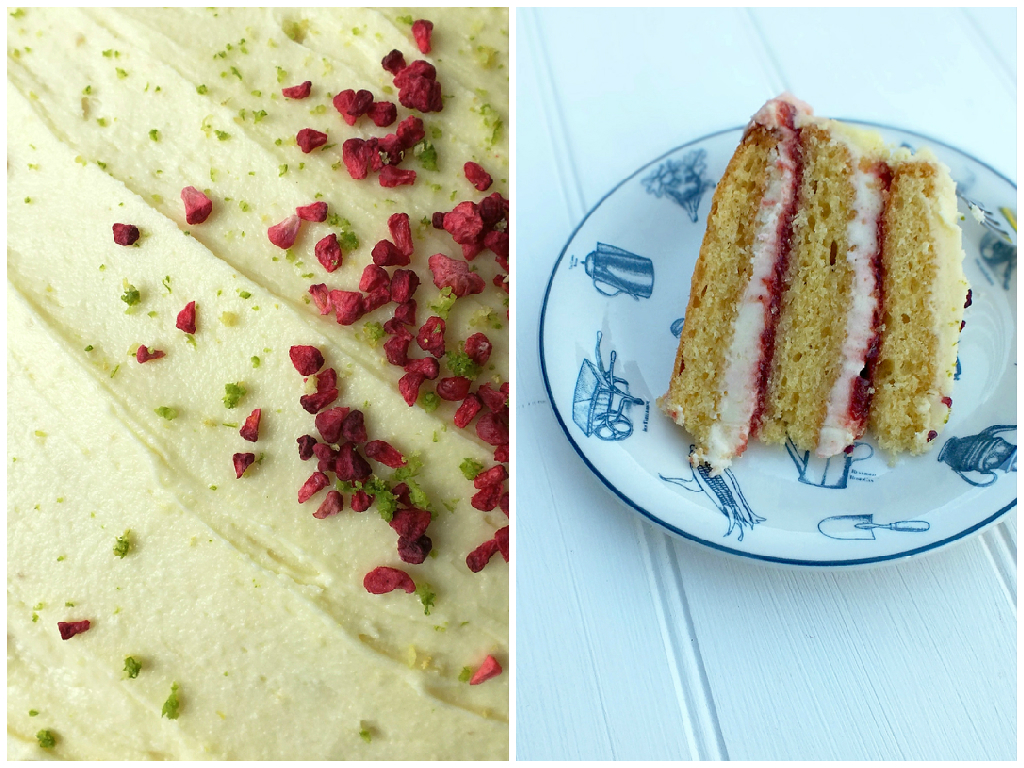
The low FODMAP cake recipe uses a vegan butter and a gluten free flour blend to ensure it’s dairy free and gluten free. The classic vanilla sponge recipe is super simple and results in a fluffy, light textured cake versatile enough for any fillings or toppings of your choosing. I went with a zesty lemon buttercream filling sandwiched next to my mum’s friend’s homemade raspberry and loganberry jam and then covered the outside with more (seriously this cake is a beast) lemon buttercream, coloured with pink, orange and yellow. I topped the finished cake with freeze dried raspberries and fresh grating of lime zest.
 The amount of icing on this cake is by no means delicate and if the butter icing is just too much or it’s not your thing at all, skip it altogether and create a beautiful bare low FODMAP birthday cake instead using the vanilla sponge recipe and layering with an alternative such as coconut cream.
The homemade raspberry and loganberry jam was amazing in this recipe, but store bought would be OK too – just check it’s made from good quality ingredients and is low FODMAP (cheaper versions tend to have high fructose contents). There’s a great blueberry jam recipe I’ve followed here before if you want to make your own and another great one I’d recommend from Oh She Glows that uses maple syrup and chia seeds for another healthier alternative that would be delicious too.With vanilla, raspberry and lemon flavours it was so good I may have had two..or three.. slices.
So when you are shoving the second piece of this glorious, buttercream filled masterpiece into your mouth remember life’s all about balance, right? And maybe just make sure breakfast the next day is a green smoothie…
To make in advance, you can freeze the sponges and keep them, wrapped in foil, for up to three weeks in the freezer.

- For the cake:
- 250g dairy- or lactose-free butter, at room temperature
- 250g brown sugar
- 250g gluten free self-raising flour
- 5 large organic free-range eggs
- ½ tsp pure vanilla extract
- 1 tsp gluten free baking powder
- Zest of 2 lemons
- For the filling and buttercream:
- 340g raspberry jam
- 250g lactose-or dairy free butter
- 500g icing sugar
- 4 tsp lactose- or dairy-free milk of choice
- 1 tsp pure vanilla extract
- A few drops of natural food colouring (pink and yellow work well)
- 25g freeze dried raspberries
- Zest of 1/2 a lime
- Preheat your oven to 170 C (150 C fan) and lightly grease 3 x 20cm (8in) cake tins, before lining with baking paper and putting to one side.
- Place the softened butter and sugar into a large bowl and beat for 5 minutes with an electric mixer on high (if you don’t have one that’s OK – it will just be a good arm workout!) until the mixture is pale and creamy.
- Crack your eggs into a separate bowl and beat with the vanilla extract before pouring slowly into the butter and sugar mixture – keep your machine running at low speed to ensure it’s thoroughly incorporated.
- Sift the gluten free flour and baking powder into the mixture slowly and add the lemon zest.
- Fold the ingredients gently into the mixture until thoroughly incorporated. You’re looking for a soft, dropping consistency when you tap the spoon on the side of the bowl. If you’re worried about the mixture being too thick, add a couple of tablespoons of dairy free milk and mix well.
- Divide the mixture evenly among the three tins, level it out with a palette knife and bake in the oven for 25 to 30 minutes. The cakes should be golden brown and spring back when touched in the centre with your finger.
- Remove the cakes from the oven, allow to cool for a few minutes before turning out onto a wire rack. Carefully peel off the paper lining and test your patience by leaving the sponges to get completely cold!
- For the frosting, beat vegan butter in medium bowl with electric mixer until light and creamy. Gradually add icing sugar and beat on low speed before adding the vanilla extract and beating further until fluffy.
- Divide the icing into 4 bowls – one more full than the others. Put the larger bowl to one side; this will be used for your filling and crumb coating.
- Add a few drops of pink food colouring to one of the smaller bowls of buttercream and yellow to another. Mix both well and add adjust the depth of colour to your liking. For the third add one drop of each and mix well to create orange coloured buttercream.
- Using a small spatula, evenly cover the top of the first layer with the plain buttercream, spreading gently so that it extends beyond the edges of the cake.
- Spread a layer of jam over the bottom of the second cake layer and sandwich the two together. Repeat these actions with the third layer to create a tiered cake, pressing gently to ensure it’s level.
- With the spatula, spread the cake with 1 1/2 cups more of the plain buttercream, plus any oozing out from between the layers, creating a “crumb coat” (a thin layer of frosting that seals in the crumbs). Pop the cake in the fridge for 15 minutes.
- Using a large spatula, generously coat the top of the chilled cake with 1 cup of your yellow buttercream, spreading slightly over the sides.
- Starting with the darkest shade of buttercream, pipe frosting onto the bottom third of the cake. Then, with the middle shade, pipe frosting onto the middle of the cake. Finish with your lightest shade of buttercream.
- With an offset spatula smooth the icing out into an even layer, trying not to mix the colours together.
- Ensure the icing on the top is smoothed over to match and top with freeze dried raspberries and the zest of 1/2 a lime.
The classic vanilla sponge recipe for this cake came from here, but has been adapted to be made gluten and dairy free.